Technical guide: Create application with Skip Pay
Welcome to the Skip Pay technical guide on creating a new application. In this guide, we will walk you through the step-by-step process of creating a new application with Skip Pay.
By following this guide, you will learn how to create a new application and integrate it with Skip Pay's payment methods.
We've designed this guide to be easy to follow and understand, with clear instructions and examples. Whether you're an experienced developer or new to Skip Pay, we're confident that you'll find this guide helpful in creating a successful application with our platform. So let's get started!
In the Skip Pay world, a financing application represents a specific partner application that will use the Skip Pay payment solution. The application is created and managed by the partner (applicant) and is linked to the partner's account on the Skip Pay platform. The application is identified by a unique application ID and has associated API credentials that allow the partner's application to make API calls to the Skip Pay platform.
Before you start
Before you start, make sure you meet all the essential requirements below before you start creating a new application:
- Active Skip Pay registration for partners
- Skip Pay API credentials (user name, password and API key)
- Postman or software with similar functionality
Step one: Login to Skip Pay
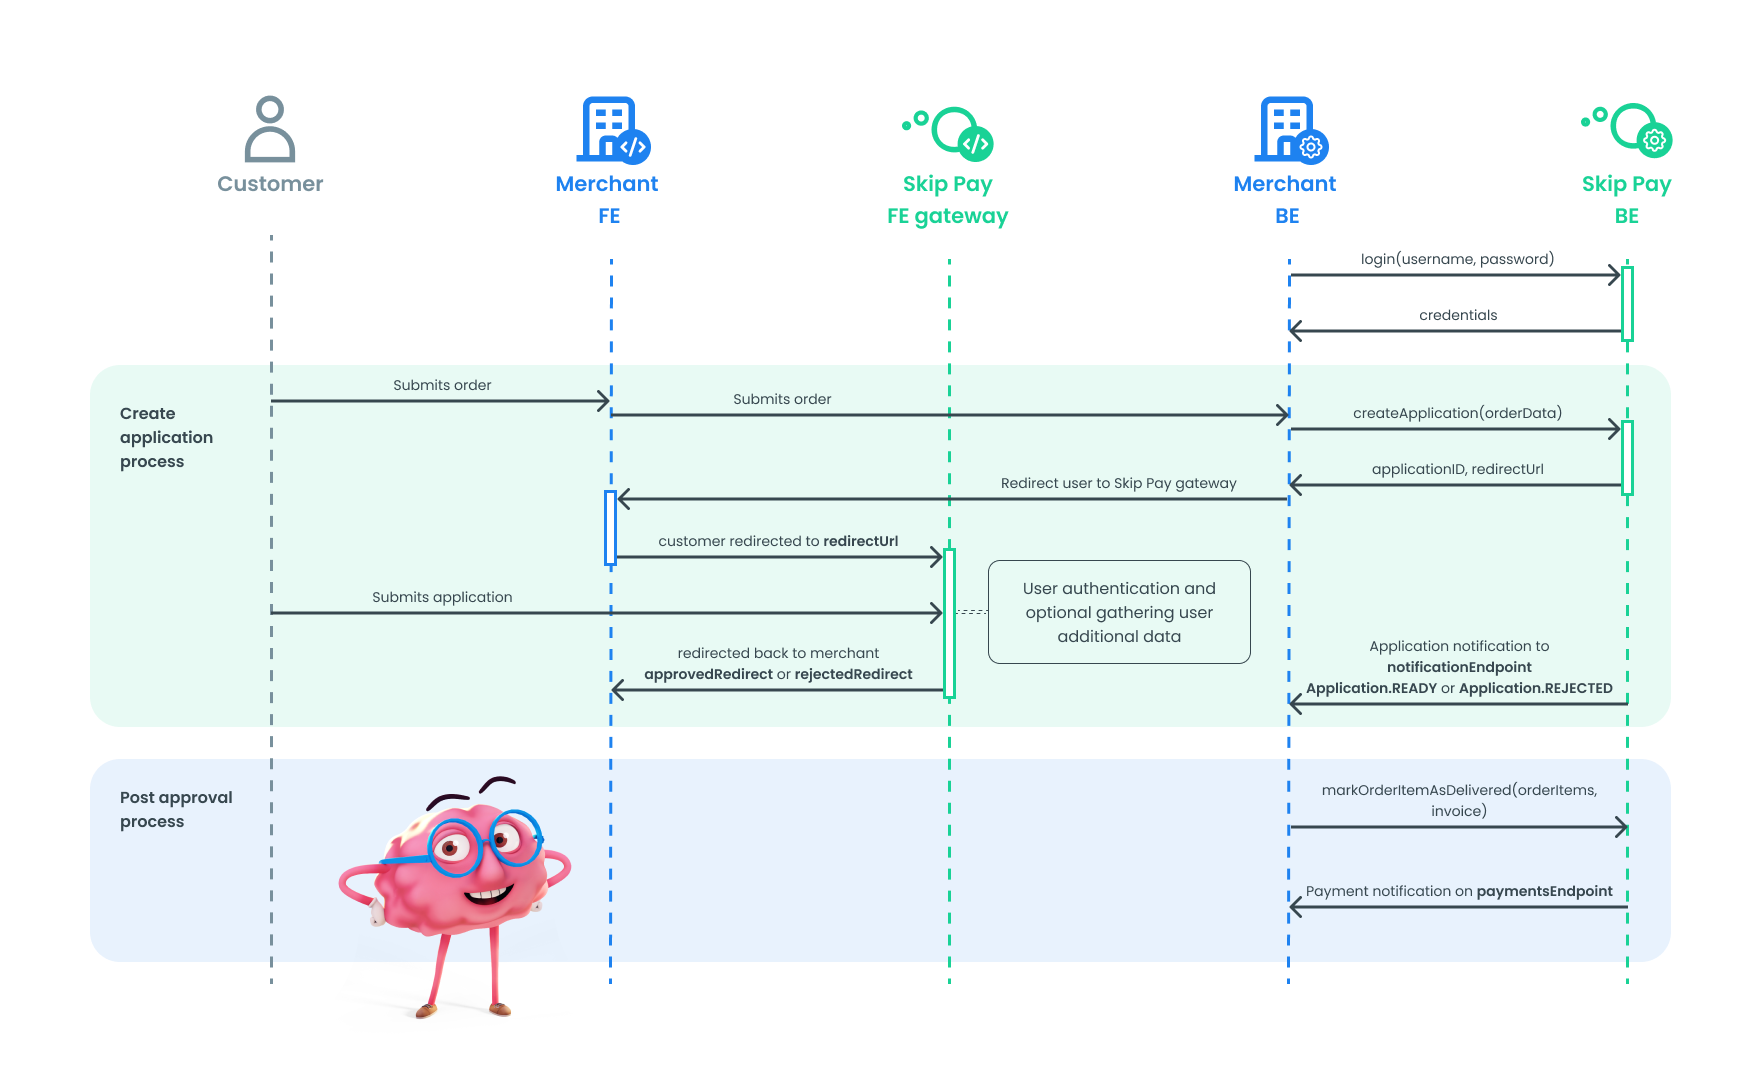
To get started with creating a new application in Skip Pay, the first step is to log in to your Skip Pay account. This will give you access to the tools you need to create and manage your applications.
:::
- Open Postman and fill: POST https://api.partner.skippay.cz/authentication/v1/partner
You can find this endpoint in our API reference, along with additional information.
- In the Body section, fill your
usernameandpassword. Your Body should look like this:
{
	"username": "yourUsername",
	"password": "yourSecretPassword"
}
- Call the REST API. Your response should look like this:
{
	"accessToken": "TokenForPartnerTokenForPartnerTokenForPartnerTokenForPartner",
	"expiresIn": 7200
}
Great! You have successfully logged in to the Skip Pay portal. You also obtain a bearer_token that you can use on the whole Skip Pay platform.
Step two: Create Application
In the second step, you will create a new application using Skip Pay services. Using our simple API will make it really easy to do so:
- Open Postman and fill: POST https://api.partner.skippay.cz/financing/v1/applications
You can find this endpoint in our API reference, along with additional information.
- In the Body section, fill in all the details about your application. Make sure that you choose the correct financing type. In Skip Pay, we provide two possible financing types:
DEFERRED_PAYMENTandPAY_IN_THREE.
Please ensure that you have filled in your merchantUrls, among other required information. This will enable us to communicate with you appropriately in case of any changes in the application's status.
- Call the REST API. Your response should look like this:
{
	"type": "DEFERRED_PAYMENT",
	"agreementTermsAndConditions": true,
	"customer": {
		"fullName": "Ing. Jana Nováková, Csc.",
		"email": "jana.novakakova@email.com",
		"phone": "+420123456788",
		"fraudPreventionData": {
			"transactionsNumber": 3,
			"cashlessTransactionsNumber": 1,
			"transactionsSum": {
				"currency": "CZK",
				"amount": 259900
			},
			"cashlessTransactionsSum": {
				"currency": "CZK",
				"amount": 1359900
			}
		}
	},
	"order": {
		"number": "CZ212235",
		"reservationDate": "2023-06-10T00:00:00+02:00",
		"totalPrice": {
			"currency": "CZK",
			"amount": 121000
		},
		"totalVat": [
			{
				"vatRate": 21,
				"amount": 21000,
				"currency": "CZK"
			}
		],
		"items": [
			{
				"code": "EXC4677-1a",
				"name": "Tefal KO851830",
				"variant": "Digital Display Black",
				"producer": "Tefal",
				"categories": ["home electronic"],
				"quantity": 1,
				"unitPrice": {
					"currency": "CZK",
					"amount": 121000
				},
				"totalPrice": {
					"currency": "CZK",
					"amount": 121000
				},
				"unitVat": {
					"vatRate": 21,
					"amount": 21000,
					"currency": "CZK"
				},
				"totalVat": {
					"vatRate": 21,
					"amount": 21000,
					"currency": "CZK"
				}
			}
		],
		"addresses": [
			{
				"name": "Jana Nováková",
				"city": "Prague",
				"country": "CZ",
				"streetAddress": "Uličnická",
				"streetNumber": "22",
				"zip": "140 00",
				"addressType": "BILLING"
			}
		],
		"variableSymbols": ["9988776655"],
		"deliveryCarrier": {
			"carrierId": "PPL"
		},
		"channel": "ESHOP"
	},
	"merchantUrls": {
		"approvedRedirect": "https://yourawesomeeshop.dev/checkout/skippay/approved",
		"rejectedRedirect": "https://yourawesomeeshop.dev/checkout/skippay/rejected",
		"notificationEndpoint": "https://api.yourawesomeeshop.dev/skippay/notification/"
	}
}
Your application was created and you are ready for the next step. To make integration easier for partners, a duplicate check is performed during request creation. If the data matches a previous request, the duplicate is returned rather than a new one being created. The API response code is 200 rather than 201 (created). For e-shop, order type, total amount, order number, and variable symbols, exact matching is performed. To avoid unintentional duplicates caused by errors or repeated clicks, the check is performed within a 20-minute window.
Step three: Redirect user to gateway
When a customer creates an application in Skip Pay, it is important to guide them through the entire process to ensure a smooth transaction. One crucial step in this process is redirecting the customer to the Skip Pay gateway after they create their order in your shop. Here is a step-by-step breakdown of how this process works:
- Redirect the customer to the Skip Pay gateway: Once the customer has created their application, the first step is to redirect them to the Skip Pay gateway. This is where the customer will authorize the payment and the customer's application will be processed and either approved or rejected based on SkipPay's algorithms.
- SkipPay approves or rejects the application: Once the customer is redirected to the SkipPay gateway, SkipPay's algorithms will evaluate the application based on a variety of factors, such as the customer's credit history and the merchant's history with SkipPay.
- Customer is redirected to approvedRedirect URL or rejectedRedirect URL: After the customer's application has been evaluated by SkipPay, the customer will be redirected to either the approvedRedirect URL or rejectedRedirect URL that you provided. If the application was approved, the customer will be redirected to the approvedRedirect URL to complete the transaction. If the application was rejected, the customer will be redirected to the rejectedRedirect URL to try again or to seek alternative payment options.
- Skip Pay sends you a notification about the status of the application: You will also receive a notification about the status of the application on the notificationEndpoint URL that you provided when the application was created. This will allow you to take any necessary actions based on the status of the application.
By following these steps and ensuring that the customer is properly redirected to the SkipPay gateway, you can help ensure that their customers have a smooth and hassle-free payment experience.
Step four: Mark order item as sent and delivered
The final step in the SkipPay payment process is marking the order items as sent and delivered. While this step is optional, at least one of the actions must be taken, depending on the agreement between you and Skip Pay on when the funds should be transferred in case of a successful application. This step can be broken down into two parts: marking items as sent and marking items as delivered. Let's take a closer look at one of them: Mark order item as sent.
Without redirection to the gateway and back, and waiting for the outcome, you won't be able to provide information about the delivery of the order to Skip Pay. Until your customer's application is approved or declined, you won't have confirmation that you'll receive payment from Skip Pay. This means you can't dispatch the goods until then.
- Open Postman and fill:
PUT
https://api.partner.skippay.cz/financing/v1/applications/{applicationId}/order/send
You can find this endpoint in our API reference, along with additional information.
- In the Path, fill in your
applicationIdthat you obtained in the response when you created the application. - In the Body section, fill in all the details about your order item(s). Your Body should look like this:
{
	"items": [
		{
			"name": "Tefal KO851830",
			"quantity": 1
		}
	],
	"totalPrice": {
		"amount": 121000,
		"currency": "CZK"
	},
	"totalVat": [
		{
			"amount": 21000,
			"currency": "CZK",
			"vatRate": 21
		}
	],
	"variableSymbol": "1234567890",
	"sentDate": "2023-06-11",
	"deliveryTrackingNumber": "EEX1221"
}
- Call the REST API. We will return you all the available information about your order(s):
{
	"number": "AA235",
	"reservationDate": "2023-06-10T00:00:00+02:00",
	"state": "SENT",
	"totalPrice": {
		"currency": "CZK",
		"amount": 159900
	},
	"items": [
		{
			"code": "EXC4677-1a",
			"ean": "888462064002",
			"name": "Tefal KO851830",
			"variant": "Digital Display Black",
			"producer": "Tefal",
			"categories": ["home electronic"],
			"quantity": 1,
			"unitPrice": {
				"currency": "CZK",
				"amount": 121000
			},
			"totalPrice": {
				"currency": "CZK",
				"amount": 121000
			},
			"unitVat": {
				"vatRate": 21,
				"amount": 21000,
				"currency": "CZK"
			},
			"totalVat": {
				"vatRate": 21,
				"amount": 21000,
				"currency": "CZK"
			},
			"productUrl": "https://www.myhomeeshop.cz/tefal-ko851830-digital-display-black-d5782285.htm",
			"state": "SENT",
			"sentDate": "2023-06-11",
			"deliveryTrackingNumber": "EEX1221"
		}
	],
	"addresses": [
		{
			"name": "Jana Nováková",
			"city": "Prague",
			"country": "CZ",
			"streetAddress": "Uličnická",
			"streetNumber": "22",
			"zip": "140 00",
			"addressType": "BILLING"
		}
	],
	"variableSymbols": ["1234567890"],
	"deliveryCarrier": {
		"carrierId": "PPL"
	},
	"channel": "ESHOP",
	"totalVat": [
		{
			"vatRate": 21,
			"amount": 21000,
			"currency": "CZK"
		}
	],
	"applicationInfo": {
		"id": "522154",
		"state": "READY",
		"stateReason": "READY_SHIPPED"
	}
}
Congratulations! You have successfully completed the process of creating a new application with Skip Pay. You have followed all the necessary steps, including ensuring you meet all the essential requirements, logging in to Skip Pay, creating a new application, marking order items as sent.
Alternatively you can use /financing/v1/applications/{applicationId}/order/send endpoint with an empty request to mark all order items (the whole order) as sent at once.
Please note that this is just the basic flow of the Skip Pay API, and there are many more possibilities to explore with applications. Check our “More?” section.
More?
Once you have successfully created a new application using Skip Pay, there are several other possibilities and features that you can take advantage of through the Skip Pay API. These include:
Changing Application Order: If you need to modify the details of your application, you can use the API to change the order details or update the financing type. This can be helpful if you need to make changes to your application after it has been created.
You can find this endpoint in our API reference, along with additional information.
Return/Cancellation Handling: In addition to the basic flow of creating and processing applications, Skip Pay also provides functionality for handling returns or cancellations. This ensures that the financing and payment processes are seamless and efficient for both you and your customers.
You can find this endpoint in our API reference, along with additional information.
Overall, Skip Pay's API provides a wide range of features and functionality to help you create and manage applications, while ensuring that the financing and payment processes are as smooth and efficient as possible. Whether you need to modify an application or handle returns and cancellations, Skip Pay has you covered.
Need help?
If you have any questions or issues related to creating payment, send us an email at integrace@skippay.cz